 LESSON 1-1 INTRODUCTION TO AUTOCAD LESSON 1-1 INTRODUCTION TO AUTOCAD |
||||||||||||||||||||||||||||||||||||||||||||||||||||||||||||||||||||||||||||||||||||||||||||
Topics covered in this Lesson: |
||||||||||||||||||||||||||||||||||||||||||||||||||||||||||||||||||||||||||||||||||||||||||||
Welcome to the world of CAD - In this tutorial you will be learning the basics of CAD. The course is designed so that the commands and instructions should work on almost any version of AutoCAD, although this version is designed specifically for AutoCAD 2010 and will work great for 2012. By the end of this level you will have the skills to develop basic 2D drawings and print them out to scale. For an introduction to what CAD is all about, check out my Blog post.
Let's
start at the beginning, these things you need to know, or the rest of
it won't make any sense at all. Make sure you have a very good
understanding of this lesson before continuing. This lesson is longer
than most, but will cover important topics. Learn it, live it.
The X,Y coordinate system
Everything that you draw in AutoCAD is exact.
It will be more accurate than you will
ever need it to be. We're talking 14 decimal points accurate. All
objects drawn on the screen are placed
there based on a simple
X,Y coordinate system. In AutoCAD this is
known as the World
Coordinate System (WCS). You must understand this to know
how to put things where you want them. (3-D work has an added
axis, the Z-axis, but this is not covered in this lesson.) Below
is a diagram showing you how this system works (place your mouse
on the diagram for more info).
In order to work effectively with AutoCAD, you have to
work with this system. Until you are comfortable and familiar
with it, learning AutoCAD will be more of a chore. My experience
in teaching is that the better a student is with coordinates,
the better CAD draftsperson they will become.
Here is how it works:
AutoCAD uses points to determine where an object is located.
There is an origin where it begins counting from. This point
is (0,0). Every object is located in relation to the origin.
If you were to draw a line straight out to the right from the
origin, this would be considered the positive X-axis. If you
were to draw a line straight up, this would be the positive Y-axis.
The picture above shows a point located at (9,6). This means
that the point is 9 units over in the X-axis and 6 units up in
the Y-axis. When you are working with points, X always comes
first. The other point shown is (-10,-4). This means that the
point is 10 units in the negative X-axis (left) and 4 units in
the negative Y-axis (down).
A line has two points, a start point and an end point. AutoCAD
works with the points to display the line on the screen. Move
your cursor over the picture above and you will see line drawn
from the absolute points
of (-10,-4) to (9,6).
Most of the time you will not have an indication of where the
origin is. You may need to draw a line from the endpoint of an
existing line. To do this you use relative points.
These work the same way, but you have to add the @ symbol
(shift+2)
to tell AutoCAD that this next point is relative from the last point
entered.
To review:
ABSOLUTE POINTS are exact points on the drawing drawing space. RELATIVE POINTS are relative to an OBJECT on the drawing space.
Its a simple system, but mastering it is the key to working
with AutoCAD and is explained in more detail further below.
Angular Measurement
AutoCAD measures angles in a particular way
also. Look at the diagram below and then place your mouse on
it to see how this is done.
When drawing lines at an angle, you have to begin
measuring the angle from 0 degrees, which is at the 3 o'clock
position. If you drew a line at 90 degrees, it would go straight
up. The example above (when you move your mouse over it) shows
a line drawn at +300 degrees (270+30), or -60 degrees.
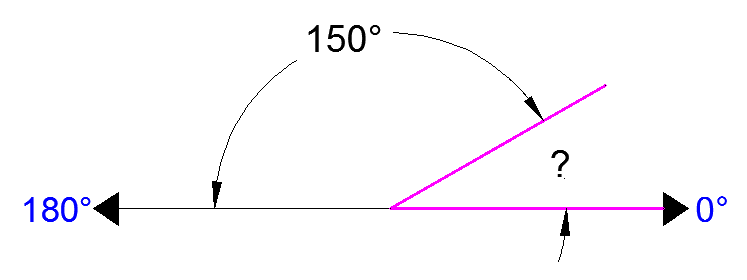
You might not always have an obvious reference
point for 0 degrees. Look at the example below and place your
mouse on the image to find out the angle in question.

In this example, you are given information about
the lines, but not the angle AutoCAD needs to draw the line from
the start point. What you are given though, is (a) the knowledge
that 0° is at the 3 o'clock position (b) the knowledge that
180° is at the 9 o'clock position and (c) the angle between
180° and the line you want to draw is 150°. With this
information, you can figure out what angle you need. Here is
a fool-proof way of getting the angle you need:
1.) Start at the 0° position and measure counter-clockwise
(+) to 180°.
2.) From 180°, measure clockwise 150° (-)
3.) Consider that you just went +180-150 and use
that as an equation: +180-150=30
4.) Now you can draw your line using polar
coordinates (discussed below)
Entering Points in AutoCAD
You can enter points directly on the command line using three
different systems. The one you use will depend on which is more
applicable for the situation. The first assignment will get you
used to this. The three systems are as follows:
ABSOLUTE CO-ORDINATES -
Using this method, you enter the points as they relate to the
origin of the WCS. To enter a point just enter in the exact point
as X,Y.
RELATIVE CO-ORDINATES -
This allows you to enter points in relation to the first point
you have entered. After you've entered one point, the next would
be entered as @X,Y. This means that AutoCAD
will draw a line from the first point to another point X units
over and Y units up relative to the previous point.
POLAR CO-ORDINATES - You would
use this system if you know that you want to draw a line a certain
distance at a particular angle. You would enter this as @D
The three ways of entering coordinates shown
above are the ONLY way
AutoCAD accepts input. First decide which style you need to use,
and then enter as shown. Remember that X is always before Y (alphabetical).
Don't forget the '@' symbol when you are entering relative
points. Any typing error or omission will give you results you
don't want. If you make a mistake and need to see what you typed,
press F2 to bring up the text screen and check your typing. (press F2 to get back to your drawing.)
More AutoCAD BasicsThe AutoCAD Screen
Move your cursor around the image above to find the names of various
areas
of the screen.
| ||||||||||||||||||||||||||||||||||||||||||||||||||||||||||||||||||||||||||||||||||||||||||||
A way of inputting points based on AutoCAD's origin.
|
|
Acad.dwt
|
This is the default template that automatically loads
whenever you start a drawing session. It can be customized to suit your needs.
|
Associated Dimensioning
|
Dimensions that are associated with specific points will
update as that point is moved.
|
Backup file
|
AutoCAD can be set to automatically backup your drawing
and save it. This is a safeguard in case your file gets
corrupted. It is saved with a .BAK extension
|
A pre-drawn image you can insert in your drawing to save
time and make your file size smaller.
|
|
| Clean Screen | A display setting that gives you maximum drawing space. |
Crosshairs
|
This is your cursor when it is in the drawing space.
|
Cursor
|
Your cursor will change depending on what function it is performing in the
program.
|
Database
|
An AutoCAD drawing file is actually one large database
containing all the information needed to reproduce the
objects when the file is opened. Info for layers and linetypes,
etc are stored in this manner.
|
Dialog box
|
AutoCAD uses a large number of dialog boxes to get information
from you. You must know how input the information that
it asks for.
|
This is a file that contains preset values for frequently
used settings. AKA a prototype drawing. The file extension
is DWT.
|
|
Extents
|
The outer boundaries of the objects you have drawn.
|
Grid
|
This is pattern of dots displayed on the screen to guide
you. It can be toggled on and off by pressing the F7 key.
|
Small 'handles' on objects that allow for quick editing.
|
|
Layer
|
All objects are drawn on a layer. You can group objects
(such as electrical) on a single layer and organize your
drawing.
|
Layout Tabs
|
A space used for plotting your drawings (formerly called Paper Space).
|
Limits (Grid)
|
A
setting to impose an 'artificial' boundary on your drawing
that sets the area of the grid,
and when turned on, limits you to drawing in the grid area.
|
All objects are drawn with a particular linetype. Examples
would be solid, center, dashed, etc.
|
|
Model space
|
The drawing space where you 'model' the objects.
|
Modify
|
A generic term used for changing your objects
|
Object
|
Any item that is in the AutoCAD database. Also known as
an entity.
|
The (0,0) point of your current coordinate system.
|
|
Ortho mode
|
This is a drawing mode that allows you to draw only perpendicular
lines. It is toggled on and off by pressing the F8 key.
|
| Orthographic Projection | A standard drawing method that shows 2 or more views of the same part. |
This is a method of 'snapping' to certain, precise points
on an object.
|
|
| Pan | To move around drawing by dragging the drawing area around your screen. |
| Panel | A grouping of commands on the ribbon |
Path
|
The specific folder where AutoCAD looks for, or saves
files.
|
Pick
|
To select an object by 'left-clicking' on it.
|
Plot
|
Also known as print. To make a hard copy of your drawing.
|
A way of inputting points based on distance and angle.
|
|
Property
|
Any specific characteristic of an object such as layer,
scale, linetype, start point, etc.
|
| Ribbon | The Ribbon runs across the top of the drawing space and contains panel - each panel has a group of associated tool. Switch to different panels by clicking on the tabs at the top of the ribbon. |
A way of inputting points based on a starting point.
|
|
| Section View | A drawing that represents a cross section of a part or assembly. |
The current group of objects selected for modifying.
|
|
Snap
|
This is a drawing mode that allows you to snap your cursor
to precise points laid out in a grid pattern. Toggle with
the F9 key.
|
Styles
|
Formatting that defines the look of text, dimensions,
etc.
|
Units
|
The basic drawing unit set for you drawing. For example,
you can use inches or millimeters depending on your needs.
You can also set the precision you want displayed, such
nearest 1/4", 1/2" 1/64", etc.
|
User coordinate system (UCS)
|
Modifications made to the World Coordinate System (WCS)
results in a User Coordinate System (UCS)
|
View
|
A particular area of your drawing.
|
A separate 'window' on your drawing. You may have more
than one viewport visible to see different areas of your
drawing at the same time.
|
|
Wizard
|
An easy step-by-step instruction set to help you set-up
certain aspects of your drawing.
|
This is the common X-Y coordinate system that is the
default. If it is modified, it becomes a User coordinate
System (UCS)
|
|
To view either a smaller section of your drawing (zoom
in) or a larger section (zoom out)
|


 To
remove the ribbon and have the most drawing space available, click on
the "Clean Screen" icon in the bottom right corner of the screen. To go
back the to the standard display, click again on the same icon.
No comments:
Post a Comment